Showing posts with label customization. Show all posts

Wednesday, February 17, 2010

Referencing Detail and Referencing Sheet

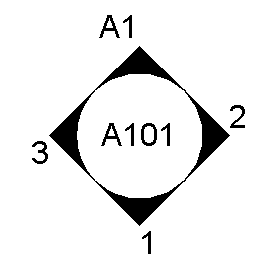
Some of our government clients wants us to show the referencing sheet and detail numbers in the View title like:

image

Revit has this nice feature too!

image

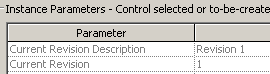
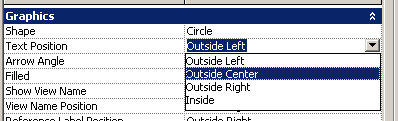
Basically, these parameters show the sheet number and the detail number where this particular detail is referenced. This works perfect in most of the cases. However, sometimes the detail is referenced in more than one view (and so in different sheets). This can happen because of many reasons – dependent views or ‘show in – intersecting views’ parameter, etc.

image

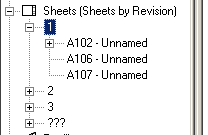
In such cases, unfortunately, there are more than one referencing sheet that refer the detail in a drawing set. It looks like Revit shows the first sheet it comes across (per alphabetical order?) in the drawing set for this referencing sheet / detail parameter. It is read only and so, we cannot change it.

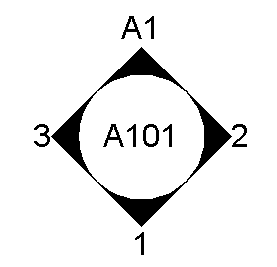
The workarounds is to manipulate the referencing sheet parameter by renaming / renumbering the sheet (not good) or to hide the unwanted callout / section / view tag category in the visibility graphics (not good again). (Just hiding the unwanted view tag using the View > Hide in view > elements option does NOT work!)

I think Autodesk should make this read only parameter a drop down menu where we could choose our preferred sheet from a list of available sheets…

If you like this option, please submit a support request with Autodesk.

Tuesday, October 21, 2008

Schedule list of Revised Sheets

Question: Is there a way to schedule drawing sheets based on their revision number? For eg., you have a project with a lots of sheets and before issuing a new Revision set, you want to get a list of the sheets that will be issued for this particular revision.

Even though there is a Revision parameter in the sheet properties,
image
it is not exposed in the list of available fields for the Drawing List schedule.
image
So, it looks like getting a list in a schedule form seems to be difficult.

However, you can use browser organization to group the sheets that belong to each revision numbers in the Project Browser. To do this:

  1. Go to Settings menu > Browser organization > sheets tab > New > name it as "Sheets by Revision"
  2. In the Browser Orgn Properties dialog box, in the 'group by' select 'Current Revision' and hit ok.
    image
  3. The project browser now groups the sheets by the current Revision Number.
    image

Monday, July 21, 2008

Remove view names from Interior elevation tags

The Interior elevation tag in the default template in Revit shows the view name for some reason. As far as I know, most of the offices don't require this.

image

To change this, go to Settings menu > view tags > elevations tags. Then select the 1/2" circle type (which is the type used for interior elevations). Uncheck the 'Show view name' parameter.

image

When you hit apply, the elevation tag becomes:

image

To center the text, change the Text Position parameter to Outside center.

image

The elevation tag looks like this now:

image

It is better to make this modification in the default template, so that this setting need not be changed in new projects.

Tuesday, July 8, 2008

Sheet Issue Date

Revit titleblocks have a Project issue date parameter. This is also part of the Project information accessed from the Settings menu. All Revit OOTB Titleblocks have this parameter in them.  Changing the value of this parameter changes the date in all the sheets. However, in some cases, we may not want to change the date for all the sheets but only some, for eg. Addendum 1 set of sheets. Revit has a parameter called Sheet Issue Date in the titleblock family that should work. This is an instance parameter of the Sheet object. If you want to change this parameter for a bunch of sheets, you could select all the relevant sheets in the project browser and right click on them to get the properties and change it there.

image

You can also group the sheets in a schedule and edit it there.

If you already have a Title block in the project with the Project Issue Date parameter and if you edit the TB to use the Sheet Issue Date parameter, Revit assigns the Project issue date value to the sheet issue date by default! 

One could create a TB family with both the Project and sheet issue date parameters with a visibility switch to swap them in different types.

Wednesday, June 11, 2008

Custom Hatch pattern in Revit

Revit allows AutoCAD hatches to be used. The AutoCAD hatch pattern files have an extension 'pat'. They are just text files. They can be opened in a text editor like notepad. Like this Brick Flemish bong hatch.

*Brick_Flemish, Brick: Modular - Flemish bond
0, 0,0, 0,2.666666666
90, 0,0, 2.666666666,6, 2.666666666,-2.666666666
90, 4,0, 2.666666666,6, 2.666666666,-2.666666666

You can modify that to:

*Brick_Flemish, Brick: Modular - Flemish bond
;%TYPE=MODEL
0, 0,0, 0,2.666666666
90, 0,0, 2.666666666,6, 2.666666666,-2.666666666
90, 4,0, 2.666666666,6, 2.666666666,-2.666666666

'save as' for Revit. To create a Drafting pattern, you enter ";%TYPE=DRAFTING" instead of ;%TYPE=MODEL.

You can import this pat file from the property dialog box of any Filled Pattern

image

or from Settings menu > Fill Patterns...

Tuesday, June 3, 2008

Editing Level Heads text height

The text height of the level heads are a bit larger (1/8") than the default text height (3/32"). One of our teams wanted to change the height  of level heads to be that of normal text height. Here are the simple steps:

  • Get the name of the level head family that is being used in the project level heads.
    image
  • Find this type in the project browser > families > annotation symbols >
    image 
  • Right click and select Edit.
  • Once in the Family Editor, change the height parameter in the Label type properties to 3/32"
    image
  • Load into project.
  • Now, if you want to have different size level heads in Sections, elevations and details, then you are on your own!

Monday, May 19, 2008

Revit startup script to swap INI file

Last week I had written a blog about a simple installation script for Revit. Somebody had asked about a startup script.  We use a script to launch Revit.  This allows us to change the Revit.ini (if need be), keyboardshortcuts file, add API extensions, etc in individual boxes as and when we want it, even after the initial installation. This helps people using laptops too, making the whole process transparent. (The laptop person has to borrow licenses to use Revit fully or should have a standalone license)

To set this up, we typically create two INI files: Revit.ini - points to network resources and Revit.loc - points to local resources. Both these files are copied to "C:\Program Files\Revit Architecture 2009\Program". The script checks for a network file. If it finds it, (= network is available) then Revit launches with REVIT.INI. If the script does not find the network, then it renames REVIT.INI to REVIT.NET and then renames REVIT.LOC to REVIT.INI and opens Revit.  While in the business of swapping INI files, we also run a BATCH file whenever Revit is launched. Currently this batch file is empty, but we could add commands as and when we need them!

Currently, when an user opens a RVT file directly from Windows explorer, the startup script for Revit does NOT run. We have not YET gone that far to link the RVT extension, etc to go through the batch file, but encourage users to open Revit first and then open the project within Revit. Here is the sample batch file, please use it at your own risk.

**********************

@echo off
if not exist "Z:\REVIT\Support\RAC2009Start.bat" goto RevitnoNet

:RevitNet
call Z:\REVIT\Support\RAC2009Start.bat
if exist "C:\Program Files\Revit Architecture 2009\Program\Revit.loc" goto Revit
rename "C:\Program Files\Revit Architecture 2009\Program\Revit.ini" Revit.loc
rename "C:\Program Files\Revit Architecture 2009\Program\Revit.net" Revit.ini
goto Revit

:RevitnoNet
@echo off
cls
@echo.
@echo.
@echo.
@echo.
@echo Please wait... Network connection is NOT detected...
@echo.
@echo.
@echo Please open 'Windows Explorer' to check if Z drive is present.
@echo.
@echo.
@echo If you are working on a laptop and off the network then,
@echo.
@echo.
pause
if not exist "Z:\REVIT\Support\RAC2009Start.bat" goto Revitlocal
goto RevitNet

:Revitlocal
if exist "C:\Program Files\Revit Architecture 2009\Program\Revit.net" goto Revit
rename "C:\Program Files\Revit Architecture 2009\Program\Revit.ini" Revit.net
rename "C:\Program Files\Revit Architecture 2009\Program\Revit.loc" Revit.ini
goto Revit

:Revit
rem sTART REVIT
"C:\Program Files\Revit Architecture 2009\Program\Revit.exe.lnk" %1
exit

**********************

Monday, March 24, 2008

Custom Sheet / View Browser Organization


To create your own custom sheet / view organization, you can select the “sheet” category in the project browser and then click on the property tool. You can select any type other than the “all” and edit its folder and filter parameters. You can create groups (folder) of many of the parameters.
Here is a step by step guide to create a custom group. First we create a project parameter for “Folder Name”
Go to Settings > Project parameters > add one called “Folder Name” of Text type and select only the Drawing Sheets and Views categories to apply. 
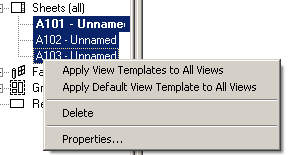
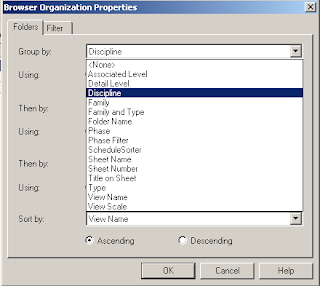
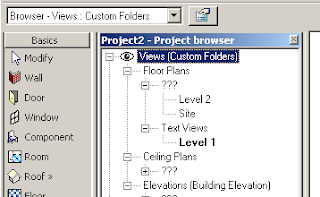
Select “Views” in the project browser and click the properties button.
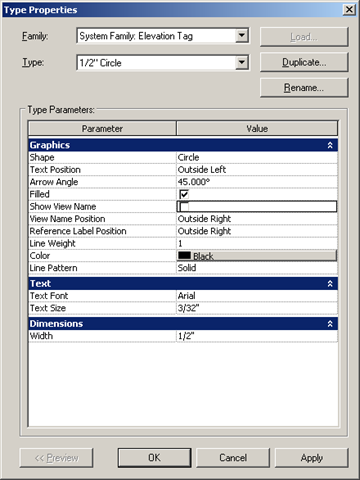
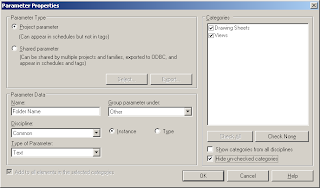
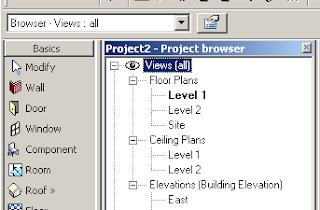
Hit duplicate in the type properties dialog box. (Duplicate is not available when the type “All” is selected. You have to select a different one) and name it “custom folders”
Hit the Folders button and select “family and type” from the drop down menu in the folders tab for “Group by” and select “folder name” from the drop down menu for “then by” (the project browser will be grouped by Family and type first and then by the folder name parameter we just created.
Click ok twice to dismiss all dialog box.
Now your project browser should have changed and should have lot of ‘?’ marks. This just means that these folders are not yet named / created.
To create a folder, right click and go to a particular view’s property. At the bottom the project parameter “Folder Name” that we had created shows up. Just type the name of the folder you want for eg. “Text views”.
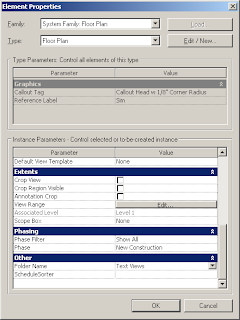
Now Revit will create a group called Text views and show the particular view within it. You can select a bunch of views in the project browser to move them to this folder or create another folder.

Friday, March 21, 2008

Install custom Revit commands

Sometime back I created a custom utility to install revit command and uploaded at augi.com at http://forums.augi.com/showthread.php?t=67696 This exe file installed custom command DLLs one at a time.

I uploaded a tweaked version of this utility at
http://forums.augi.com/showthread.php?p=824503
that might help CAD Managers. This utility installs a bunch of DLLs in a system. CAD Managers can run this utility through a windows script or batch file.

You have to be a member to access augi links. Membership is free. (Or you can email me if you want a copy of the ZIP file that contains the instructions and the code)

Tuesday, March 18, 2008

Sheet not visible in Project Browser


We have had some reports that the sheets dissappear from the Project Browser. When people tried to create the sheet again, Revit gave an error saying that the sheet already exists in the project.
The sheets may be hidden using one of the Revits Sheet organization techniques. This option is available so that you can organize sheets in a folder (subcategory) format in the project browser. Not unlike revit schedules, you can show only certain sheets in the project browser and hide some others. To find the missing sheet, you can select the “sheet” category in the project browser and select the type “browser-sheets-all” in the type selector. Now the project broser should show all the sheets.