Thursday, July 31, 2008

Rotating Elevations

Elevation tags automatically align perpendicular to the wall. However, if we want to elevate a custom casework, etc., Revit does not rotate the tag and aligns it. In such a case, you could insert the elevation tag and then rotate it.

However, if you select the elevation and try to rotate it, Revit does NOT do anything.

image

To rotate it successfully, you need to select the whole elevation tag (in this case, the circle).

image

Wednesday, July 30, 2008

Insufficient Privileges for API

We are experimenting with reducing the user privileges in Windows. If we make a user less than a Power User, Revit spits this warning while opening the software for the first time.

insufficient privileges

Doing exactly what is suggested in the warning dialog - login as admin; open and close revit; login as regular user - solves the issue.

However, certain pre-built User types in Windows restrict users from editing any files / folders in the C drive root directory (C:\) and anything inside the "C:\Program Files".  Because of our Revit.ini is sitting uncomfortably in the "C:\Program Files\Revit Architecture 2009\Program", Revit does not like it... (does not update the recent used files, etc.) Writing Journal files also is an issue. Opening up the folder "C:\Program Files\Revit Architecture 2009" to the user has worked so far.

Friday, July 25, 2008

Invisible constraints

Revit allows to constrain objects. One of the ways to constrain is to dimension the objects and then lock the dimension.

image

Revit also allows one to delete this dimension, after constraining, but keep the constraint. In such a case, when you highlight a constrained object, it shows the constraint in dashed green link with a padlock.

image

Right clicking on the padlock and selecting "Show Related" highlights the constrained objects.

image

So far so good. However, if you switch off the Constraints object in the Annotation category tab in the VG dialog box, Revit does not show any clues on the constrained element.

image

May be there are other unexplained invisible constraints. If so, you might be able to solve it using this wild goose chase.

Thursday, July 24, 2008

Cant make type error

Sometimes when we load a family into a project, Revit spits out a can't make type error and does not import anything.

family error

This error is typically caused because of "0" values in some of the parameters. For instance, if someone starts creating a family from a template and does NOT use some of the parameters like width. This family would be a non parametric family.  Revit assigns the value zero to these unused parameters but a Revit project cannot accept the zero value for certain parameters...(width, etc.) So, Revit does NOT load this family into the project.

bad parameters 

To rectify this, open the family and then the Design bar > Family types. In the dialog box, select the unwanted parameter and delete it. After deleting all these unwanted parameters, the family should load properly (and since the family is NOT parametric, deleting these parameters should not affect the family too.)

Tuesday, July 22, 2008

Half tone specific layers in linked CAD

In our office we don't model existing structures. We just use the CAD file to show the existing building for various reasons. We typically halftone the DWG to represent the existing phase. We do it in the VG > Imported categories.

image

While doing the Demo Plan, it gets tricky because we need to highlight the demo objects. Usually we place these objects in the Demo layer and make the linetype of this layer BOLD and DASHed. To show specific layers in different linetype/thickness, we cannot apply the Halftone at the DWG level. These have to be applied at the layer level. To achieve this,

  1. Uncheck the haltone box.
  2. Click on the plus + sign to reveal all the layers in the dwg.
    image
  3. Select all the layers with shift + click. and then select override to override all the layer colors to halftone.
    image
  4. After this, one can select specific layers (like our Demo layer) and override it with other linetypes / colors, etc.

Monday, July 21, 2008

Remove view names from Interior elevation tags

The Interior elevation tag in the default template in Revit shows the view name for some reason. As far as I know, most of the offices don't require this.

image

To change this, go to Settings menu > view tags > elevations tags. Then select the 1/2" circle type (which is the type used for interior elevations). Uncheck the 'Show view name' parameter.

image

When you hit apply, the elevation tag becomes:

image

To center the text, change the Text Position parameter to Outside center.

image

The elevation tag looks like this now:

image

It is better to make this modification in the default template, so that this setting need not be changed in new projects.

Friday, July 18, 2008

Edit Sketch - lost

In some cases, while we try to edit the sketch (of an extruded roof or in-place ceiling, etc.), the whole object goes missing. Here is an extruded roof:

image

when I click the edit button in the option bar,

image

the roof vanishes and there is nothing to edit. In a complex, big project this can be irritating to Revit beginners. The reason here is that the reference place that was used to draw the sketch of this extruded roof is 'in-front' of the section plane and so Revit does not show it! This is shown in this plan view.

image

The magenta is the sketch, seen from top. Note the section tag is pointing to the opposite direction. In this case, to edit the sketch, one needs to be in the West Elevation

image

or flip the section momentarily. (Revit allows you to flip the section during the edit roof command...right click on the section tag in plan and select 'flip'.)

Tuesday, July 15, 2008

Equality constrain anchor

While creating a family with an equality constraint, sometimes, we want one of the elements to stay put and move the other elements based on the parameter changes. Revit has an anchor (image ) symbol that represents the object that would stay put.

When we select one of the equality constrained elements and Revit shows this symbol on the dim line. That will be the anchor line for the constrained elements. If one element is moved, all the other elements will be moved (to maintain the equality) keeping this dim line as the origin.

image

Pinning the element also gives almost the same result. We cannot move the pinned element, but an anchored element can be moved. (revit automatically switches the anchor to the neighboring element!)

Friday, July 11, 2008

Rotate view on sheet

The easiest way to rotate a view on sheet is to change the "Rotation on Sheet" option in the option bar.

image

One can only rotate it to 90 degrees. any new text or dimensions added to the view gets screwy. The view title bar also gets rotated.

image

Some of these things can be corrected. But there are better ways to rotate the view.

Autodesk recommends rotating the crop boundary of the view itself using the rotate command. If you are in a sheet, you have to activate the view first. It rotates the view itself and one can rotate to any degree. The text and dims and the view title bar work fine.

image

The rotate command is NOT available if the orientation of the view in the View Properties dialog box is set to True North. (Only views oriented to Project North can be rotated this way!)

image

Elevation views cannot be rotated. But sections can be rotated with mostly unwanted results.

If you want to rotate all plan views, you can use the Tools menu > Project Position / Orientation > Rotate true north option. This options allows you to keep  some views in one orientation (project north) and some other in another orientation (True North) For eg., keep the Site plan oriented to true north and keep all the floor plan oriented to the sheet!

Thursday, July 10, 2008

Save to Central differences

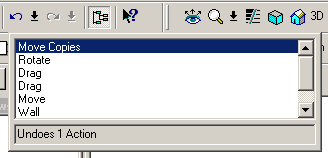
There are some differences between the tool bar button save to central

image

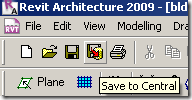
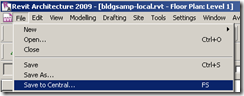
and the File menu > Save to central...

image

STC using the tool bar button relinquishes everything except the 'User Created worksets'. This also does not save the local file.

image

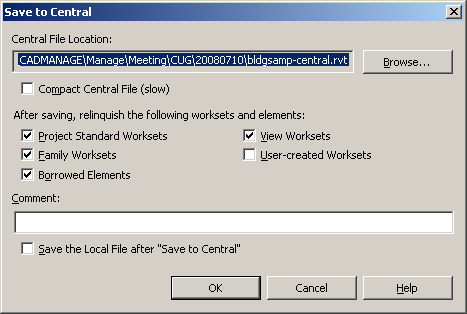
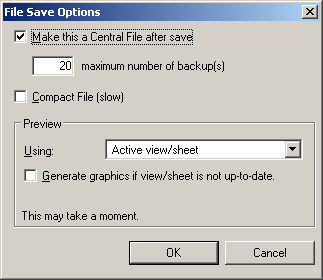
The File menu > Save to central... has options to selectively relinquish elements, to compact central file and to save the local file.

After a successful STC, if you close your local file without saving (or if the local file crashes) then the local file become out of sync with the central. A new local file has to be created to remedy this. To side step this issue, it is better to check the"save the local file after STC" box.

From RAC help about compacting central file:

"During a normal save, Revit Architecture only writes new and changed elements to the existing files. This can cause files to become large, but it increases the speed of the save operation. The compacting process rewrites the entire file and removes obsolete parts to save space."

Wednesday, July 9, 2008

Saving to Central erases walls

This happened today morning. (surprisingly this is very similar to Steve's post!)

Some of our exterior walls started vanishing after our users saved to central. It looks like the exterior walls were deleted by mistake and the mistake was saved to central just before end of day yesterday. Today morning people opened their local files and saved to central, only to find that some exterior walls vanishing. We didnt want to rollback or use backups because so much of work has already been done. Even though it would have been easier to create the missing exterior walls, the original ones had inserts (which were scheduled), dims, etc associated with them.

We worked around by opening a local copy (that was not yet saved to central yet) and copied and pasted the missing elements into the central file. Subsequent saves to centrals after the missing elements were added into the central file turned out ok.

Now, how did the walls get deleted in the first place...?

Tuesday, July 8, 2008

Sheet Issue Date

Revit titleblocks have a Project issue date parameter. This is also part of the Project information accessed from the Settings menu. All Revit OOTB Titleblocks have this parameter in them.  Changing the value of this parameter changes the date in all the sheets. However, in some cases, we may not want to change the date for all the sheets but only some, for eg. Addendum 1 set of sheets. Revit has a parameter called Sheet Issue Date in the titleblock family that should work. This is an instance parameter of the Sheet object. If you want to change this parameter for a bunch of sheets, you could select all the relevant sheets in the project browser and right click on them to get the properties and change it there.

image

You can also group the sheets in a schedule and edit it there.

If you already have a Title block in the project with the Project Issue Date parameter and if you edit the TB to use the Sheet Issue Date parameter, Revit assigns the Project issue date value to the sheet issue date by default! 

One could create a TB family with both the Project and sheet issue date parameters with a visibility switch to swap them in different types.

Monday, July 7, 2008

Close Revit without Saving

Long time ago, we could open any DWG file, play with it all we wanted, erase stuff, explode dimensions, and in the end, close the DWG without saving, and so, the world would be normal once again. However, in a Revit workshared file, it is very difficult to do this. Here are some guidelines:

The moment an objects is moved or edited, or a scale changed in a view, that objects/view is been borrowed from the central file and a 'lock' is placed on that item, so that others cannot change it. When we undo that change, the lock is NOT removed. The item is still borrowed.

  1. To close without saving any changes, the best bet is to try to UNDO all the changes first. Revit has this arrow drop down option that can be used to do multiple undos at one time.
    image
    After undoing till the beginning, the local file is technically the same as the central file (except that you have borrowed quite a lot of objects) and so, one can safely go to File menu > Save to Central... and relinquish all the objects. This is the recommended method.
  2. However, Revit does NOT allow one to UNDO certain processes.
    image image
    and shows the not so good looking undo arrow that is grayed out. OR you will get this 'Cant undo' message:
    image
    In such a case, go to File menu > close. You will get a dialog box like this. Based on your circumstance, some of the keys may be grayed out.
    image
    You have to select "Dont Relinquish" and then select 'No' in the next dialog box that asks you whether to save the local file or not.
    image
    Now, you have successfully closed the local file without saving, however, still there are some objects borrowed by you in the central file. To relinquish this, you can open the local file again and go to File menu > Relinquish all mine ...  OR open the central file and then File menu > Relinquish all mine and close the file.
  3. You can also kill revit in the Task Manager and then open the local / central file and go to File menu > Relinquish all mine in EXTREME circumstances where all other options are extinct. (This can result in loss of data or file corruptions...)
  4. If after playing for sometime in the workshared revit file, you realize you want to keep this NEW option, but dont want to save to central (dont want to update the central file with these changes), you can go to File menu > Save as... and then select the options button and then select "Make this a central file"
    image
    and save the changed file as a new standalone file. (You will still have to open the local or the central file and go to File menu > Relinquish all mine... to be nice to your other team members.)
  5. If you dont want to think about all these things, you could open the workshared file with the detach from central option, in the File open dialog box:
    image 

Thursday, July 3, 2008

Callout view - plan vs detail

Q: When creating an enlarged plan (say, a toilet or a workroom) using the Callout command in the View tab, which type - floorplan or detail - should one select?

Each view type has some built in properties and settings. Based on these differences one can choose a particular type.

Here are some differences.

  Plan callout Detail callout
Callout tag Visible in intersecting views no yes
Color schemes can be assigned yes no
Can have dependent views yes no
Project Browser categorized under floor plans details
Cut plane can be changed yes no

Here are the properties of both the floor plan and the detail:

image image

In this case, since we dont want to see a toilet plan callout tag in other views (like elevation / section) and we might want to change the view range for some reason, it is a good idea to select the Callout > Floor plan type.

Wednesday, July 2, 2008

Sharing Revit file with consultants

Here are some best practices to follow while sharing Revit files back and forth with consultants.

  1. Please ask consultants to ONLY send the CENTRAL file. Everybody in their team should have relinquished everything before sending this file. (please don’t accept LOCAL files.)
  2. Once received, copy the Revit file to a folder (for eg. consultants / structural / <<date>> / file name.rvt)
  3. Open this file from the above location.
  4. Go to File menu > manage links and remove unwanted Revit links (for eg. our architectural model that was linked by them!) or repath links, if necessary. CAD links can be imported.
  5. Do a File > saveas:
    1. In the saveas dialog box, go to options and select “Make this central file
    2. Browse to and save in a folder like: “consultants/structural/filename.rvt”.  This is the location for the latest file from the consultant always. Keeping the file in the same place would make it unnecessary to repath it inside our Revit project.

When we get an updated file from the consultant, you can repeat steps 2 to 5. (you can copy it to “consultants / structural / <<date>> / file name.rvt and do a saveas to OVERWRITE the rvt file in “consultants/structural/filename.rvt

Tuesday, July 1, 2008

Printing unreferenced view tags

The default print setup in the default templates in revit is set to print unreferenced view tags. Typically we dont print any unreferenced view tags (the sections / elevations / details etc that are called out but NOT placed (may never be placed) in sheets. The print setup dialog box has an option to turn this on or off.

image

The Hide ref/work planes option did not work for reference planes in Linked RVT files in Revit 2008. This has been corrected in the RAC 2009 version.