Tuesday, December 9, 2008

click and drag

If you click and drag some objects in Revit, Revit moves the object. This is the default behavior. However if you uncheck the 'Press + Drag' option in the option bar,

image

Revit expects you to select an object first and then move it with a click + drag. This is useful at times when some objects may be moved a little bit by accident by unsteady hands!

Even though this looks like a temporary option, changing this option gets saved in Revit.ini file and sets it for all projects, and for all users in that machine. The follwing lines are added in REVIT.INI

[Selection]
AllowPressAndDrag=0

May be this option should be made a temporary - session only - option and a separate option added in the Settings menu > Options dialog box.

Friday, November 7, 2008

deleting views deletes details along

In continuation to yesterday's blog,

If a view is deleted, Revit gives a warned like this sometimes:

image

Revit basically lists all the callout views that were created in this deleted view. For eg. when you create a callout view in a view called 'xyz', Revit assigns the view 'xyz' as the callout view's parent. And when the parent view gets deleted, the callout view is also get deleted.

image

If you dont want this to happen, you can change the Parent View parameter to none in the callout view's property.

image

Changing this value automatically changes the Far clip settings to 'independent' and the 'Show in' parameter to 'intersecting views'

image

Now deleting the parent view will not delete these callouts.

(just to irritate you, now, if you changed the value of the 'show in' parameter to "none" then the callout tag wont be visible in any views...!)

That brings us back to the best practices: It is always good to create callouts from the Primary view or in just one dedicated view, which you might never have to delete.

Thursday, November 6, 2008

Dependent Views and callout tags

I wrote sometime back about dependent views.

Here is another quirk.

It was my understanding that all the annotation objects are synced among all the dependent views and its Primary view. (This rule does not apply to "Element Hide".) The idea was that you could add annotation in any view, and as long as the annotation crop does not crop it, the annotation will be visible in other views.

When we create a new callout view from one of the dependent views, the callout tag is not visible in other dependent views and in the primary view. That's a bummer.

However, if you change the value of the "Show In" parameter in the view property to "Intersecting views" from "Parent View only" like

image

then the callout tag shows up in other views.

Ironically, this works only for the callout view type 'Detail'. If the callout view type is 'Floor Plan', this 'show in' parameter is not available. You cannot convert a Floor Plan view type to a Detail type too.

Any other view type created, like elevation, sections, etc. are visible in all relevant views. They don't have this affliction.

Also, if you create any view type (including callouts) in the Primary view, those will be visible in all relevant views. Looks like the best practice is to create any necessary view in the primary view only.

Friday, October 24, 2008

Deleting a Curtain Wall Grid

Revit allows us to delete a curtain wall grid very easily. Select the grid (use TAB key if needed) and press the delete button.

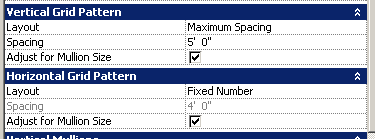
However, if the grid was created using the (out of the box) Storefront type or any other type that 'generated' the grid pattern based on the type parameters, Revit does not allow you to delete it. The type parameters for grid patterns typically look like this:

image

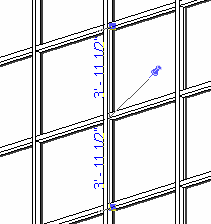
Selecting the grid also shows a pin like this:

image

Unpinning does not allow you to delete it.

To be able to delete the grids, you need to:

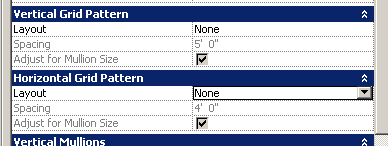
  1. Change the Grid Pattern type parameters to none like this:image
    Press ok.
  2. Revit gives a warning that the Type generated gridlines will become non-associated. Press OK. Don't press Delete Gridline button. (You dont have to delete the 'all' the gridlines, right?)
  3. Now Revit allows you to delete any unnecessary grids. You dont even have to unpin them.

It is a good idea to duplicate the CW style before changing the type parameters, so that the change does not affect any other CW.

Revit does not change any default grid patterns or any user edited custom Grid patterns when you choose "none". It just makes the gridlines non associated.

Tuesday, October 21, 2008

Schedule list of Revised Sheets

Question: Is there a way to schedule drawing sheets based on their revision number? For eg., you have a project with a lots of sheets and before issuing a new Revision set, you want to get a list of the sheets that will be issued for this particular revision.

Even though there is a Revision parameter in the sheet properties,
image
it is not exposed in the list of available fields for the Drawing List schedule.
image
So, it looks like getting a list in a schedule form seems to be difficult.

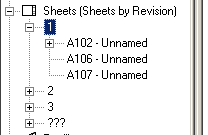
However, you can use browser organization to group the sheets that belong to each revision numbers in the Project Browser. To do this:

  1. Go to Settings menu > Browser organization > sheets tab > New > name it as "Sheets by Revision"
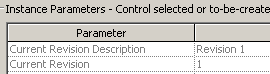
  2. In the Browser Orgn Properties dialog box, in the 'group by' select 'Current Revision' and hit ok.
    image
  3. The project browser now groups the sheets by the current Revision Number.
    image