Object visibility can be controlled in Revit in many ways.
a. Temporary switch on / off:
You can temporarily hide / unhide selected objects or categories in a view using the Hide / Isolate button available in the View tool bar at the bottom of the screen. You can also access this command from View Menu > Temporarily Hide / Isolate or by pressing the relevant shortcuts. The objects that you switch off using this method will still get printed. If you close the project and open the project again, these objects loose their temporary visibility setting.
b. Permanent visibility settings:
You can select an element and right click and select the Hide in view command to switch on/off an element or all elements that belong to the category of the selected element. 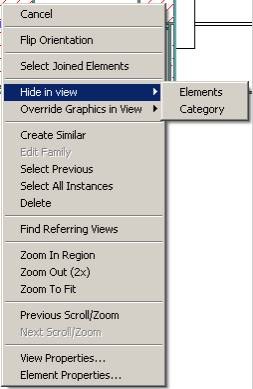
You can select an element and right click and select the Override graphics in view command to change the colors / line thickness / line pattern of the selected element or all elements that belong to the category of the selected element. 
You can also change the colors / line thickness / line pattern of these objects, and also switch them on / off using the command menu View > Visibility Graphics. The objects that you switch off using this method will NOT get printed. If you close the project and open the project again, these objects don’t loose their visibility setting. But anything you change will only affect this particular view.
c. View Templates:
If you want more than one view to have the same visibility settings, instead of changing the visibility setting for each view separately one by one, you can use a View Template. We create a view template and just assign it to other views.
· Create a View template:
1. Setup a view to your liking: Scale / shading / detail level / visibility graphics etc.
2. Go to menu View > Create View Template from view…
3. Give it a name and press ok. Now you have created a view template based on the current view. You could apply this setting to any other view later.
· Apply a view template:
1. Go to the appropriate view
2. Go to menu View > Apply View Template
3. Select the relevant “View template” you had created.
4. Press ok.
You can also right click a view or a set of views in the project browser and then select “Apply View Template”.
d. Permanent for the whole model:
To change visibility settings for objects, that affect the whole model, you have to go to menu
· Settings > Objects styles.
You can change the colors / line thickness / line pattern of these objects, but cannot switch them on / off. If you close the project and open the project again, these objects don’t loose their visibility setting. Anything you change will affect the entire model. Objects styles are NOT view specific.
e. Screening:
· To screen an individual element:
1. Select the element;
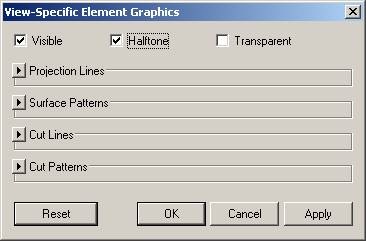
2. Right click > Override Graphics in View > By Element… ;
3. then check “Halftone”
· To screen all elements that belong to a category:
1. Select the element;
2. Right click > Override Graphics in View > By Category…;
3. Check “Halftone” for the selected objects category in the Visibility Graphics dialog box.
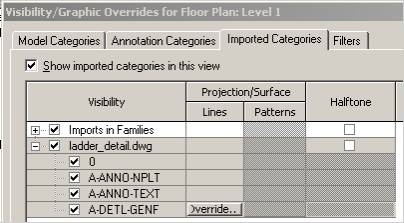
· To screen CAD Files: Similar method listed above. However, if you want to show certain layers in thick lines (like A-Demo layers in a Demo drawing) then instead of Halftoning the whole drawing,
1. Go to VG (View menu >Visibility Graphics)
2. In the Imported categories tab, select all the layers in the DWG except the one you want to make it bold
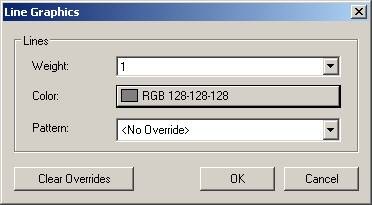
3. Override the layer color and line weight, etc.
4. Then select the layer you want bolded and override its color / line weight, etc.
f. Surface Patterns:
You can switch on/off, change colors of the surface patterns using the methods described above. If you want to change the surface pattern, you might have to create a new material with a different surface pattern or assign a different material in the property dialog box of the element.


No comments:
Post a Comment