Showing posts with label link. Show all posts

Thursday, January 28, 2010

Turn off grids and levels from linked Revit projects

We link a structural revit project into most of our revit projects. We typically develop the grid and after finalizing it, let our engineers maintain it.

We cannot show their grids in our views because, Revit does not allow the linked grid heads/extension to be tweaked. So, we typically copy/monitor the grids. However, when we tweak the grid heads, we see the linked grid head beneath:

image

One could go into the visibility graphics, and switch off the grids from the linked file on a view by view basis, but exploiting the workset option is more elegant.

Go to File menu > Manage links… and select the structural model and select ‘Reload From…”

image

and select the same linked structural file. Before pressing ‘open’, select the small arrow next to the ‘open’ button:

image

and select specify. Then press ‘open’. Revit shows the ‘Linking Worksets…” dialog box.

image

Select the ‘Shared Levels and grids’ workset and press ‘close’ and then Ok and again Ok. Now the ‘Shared Levels and grids’ workset from the linked file is closed and is NOT visible in any Revit view. Even though the linked grids are not visible, Revit still ‘monitors it!!!

image

If for some reason you want to see the structural grids, you can repeat the steps above to make them visible.

Tuesday, September 1, 2009

Structural Framing and Plan display

When we link a Structural Revit file that has structural bracing into an architectural RVT project,
image
Revit does NOT show the true cut section in the floor plan (based on the view range settings). For eg. the bracing looks like this in plan:

image

However, if we cut a detail section or callout, it looks like:

image

which is the correct representation based on the cut plane and view range.

This is unacceptable. Revit should also show the bracing in plan view types correctly. This can lead to lots of coordination issues. To make Revit display the bracing correctly, ask your structural engineer to

  • Open the steel bracing family.
  • Go to Settings > Family Category and Parameters.
  • Clear the checkbox for "Show family pre-cut in plan views".
    image
  • Reload the family back into the project.
  • After this is done, Revit show the bracing in plan like:

    image

    Even though the architect can edit the structural family to make this change, Architect’s edits in the structural file will be overridden when the structural file is updated next time by the architect. So, it is better if the structural engineer makes the edit it.

    Thanks to Autodesk Subscription team for this tip.

    Wednesday, March 25, 2009

    Architects detail lines not visible

    We, the architects, are not lazy. We use detail lines sometimes to avoid modeling. This does not sound good. However, the mantra we have, is that if the objects is not visible in multiple views, and is not scheduled, tagged, used for cost estimating, etc., and IF it saves time (now and over the course of the project), then “detail line” it. (Sorry! This still sounds bad!)

    When the engineers link the architect’s model, these detail lines are not visible in their model by default. For eg. the roof plan done by architects with some detail lines will not look complete without gutters; etc. To make these detail lines visible:

    Go to VG > Revit links tab and click on “By Host View” (which is the default option)

    image

    Select the “By Linked View” option and then select the Architect’s view in which they have drawn the detail lines.

    image

    Now you can see all our detail lines. We typically create a separate view for consultants for this purpose to make things easier.

    This change affects only the current view. You cannot hide individual objects from the architects model in this view. For more info you can check here and here.

    Friday, June 6, 2008

    Phases and Revit Links

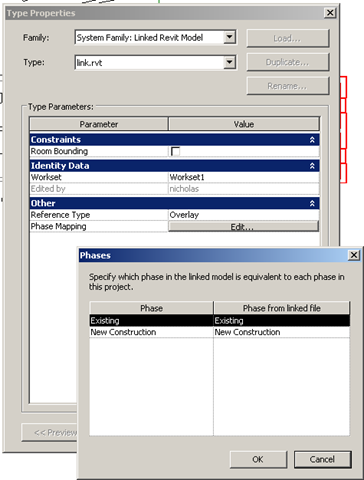
    Revit 2009 has a very good option to set phase mapping for a linked Revit file. This option is available in the Type Properties dialog box of the linked Revit File.

    For eg., if we are working on an Addition to an building that was constructed 2 years ago (both revit projects), then we can map the "New Construction" phase of the building that was constructed 2 years ago to the "Existing" phase in the Addition!

    image

    Monday, June 2, 2008

    Revit Link differences - host, link, custom

    In continuation to "Hiding individual objects in linked Revit files", people asked me why would one choose one option of linking over other - By Host View or By Linked View or Custom?

    ******************************************************
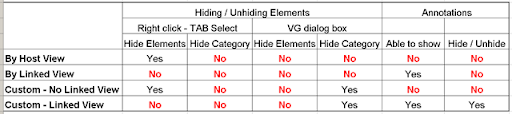
    I didn't expect this post to become too long. So, here is a summary:

    1. If you want to see annotation objects from the linked file, you have to select "By Linked View"
      OR
      select "Custom" and then select a view for the Linked View option.
    2. If you want to individually (or collectively) switch on/off objects in the linked model, then don't select By Linked View.

    image

    ******************************************************

    Here is the full version:

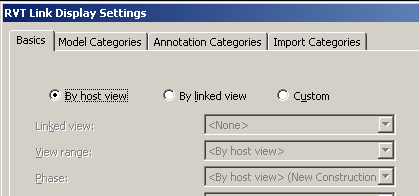
    If you choose By Host View:

    • You can individually switch on / off objects.
    • You cannot collectively switch on / off a category in the right click menu. (If you try, all the objects that belong to that particular category are switched off in both the host model and the linked model in the current view. )
    • You cannot see annotation objects (like Room tags, etc.).

    If you choose By Linked View:

    • You can choose to display by any linked view, as long as the linked view is similar to the current view
    • You cannot override any visibility settings for the linked model
    • You cannot individually switch on / off objects.
    • You cannot collectively switch on / off a category in the linked file.
    • You can see annotation objects, as long as the linked view is parallel to the current view and the annotation objects are visible in the linked view in the linked model.

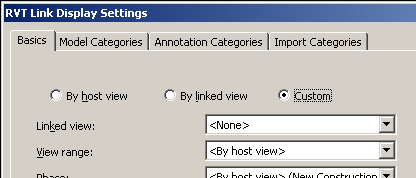
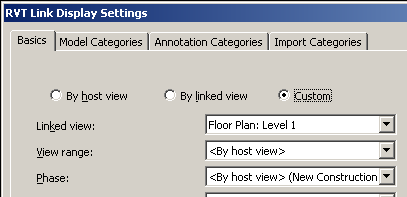
    If you choose Custom and 'None' in the 'Linked View' options in the custom basic settings:
    image

    • You can override many visibility settings for the model objects in the the linked model
      image
    • You can individually switch on / off objects using the right click menu with TAB Select.
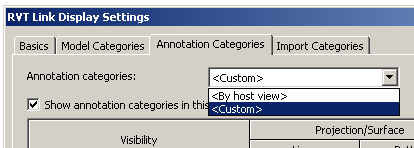
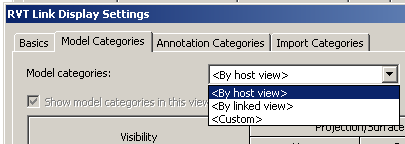
    • You cannot collectively switch on / off a category using the right click menu. However, you can switch off a model category after selecting "Custom" in the Model / Annotation categories tab in the RVT Link Display Settings.
      image
    • You cannot see annotation objects like tag, text, dims.

    If you choose Custom and select a view in the 'Linked View' options in the custom basic settings. :
    image

    • You can override many visibility settings for the model objects in the the linked model
    • You cannot individually switch on / off objects using the right click menu with TAB Select.
    • You cannot collectively switch on / off a category using the right click menu.
      image
      However, after selecting "Custom" in the Model / Annotation categories tab in the RVT Link Display Settings, you can switch off/on a category there.
      image
    • You can see the annotation objects, as long as a parallel view with annotation objects is selected in the 'Linked View' in the custom basic settings. (If the annotation objects DONT show up, you have to change the RVT Link Display Settings to 'By Host View' then press "Apply" and then change it to "Custom". )
      image

    And what about the subtype RVT link shown in the VG? Revit keeps track of each instance of the linked revit file and automatically names them as 1,2,3...) This allows you can control the visibility of individual instances of the linked file or all the instances.

    image

    Friday, May 30, 2008

    Hiding individual objects in linked Revit files

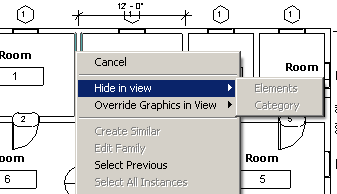
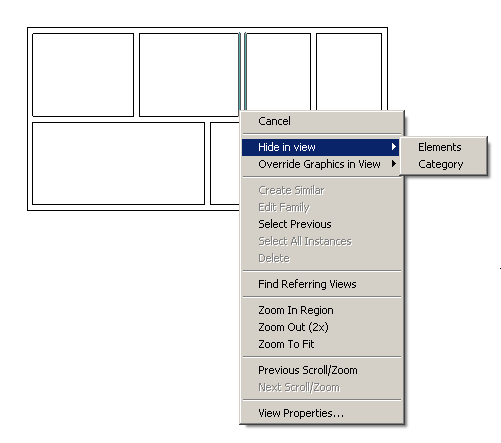
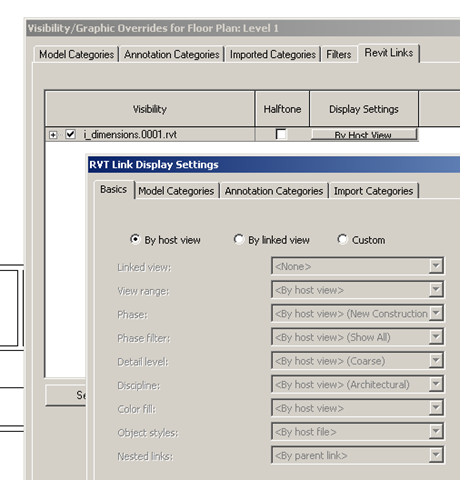
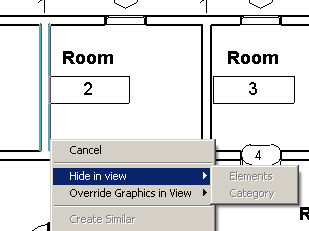
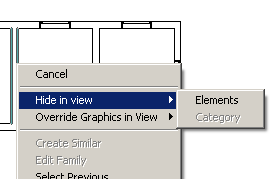
    To switch off individual elements in a linked RVT file, you could TAB select a particular object, then right click, and select 'Hide in View'. Very simple. The irony is that this works only if you have set the display setting of the RVT link "By Host View" or "Custom" in the VG dialog box.

    image image

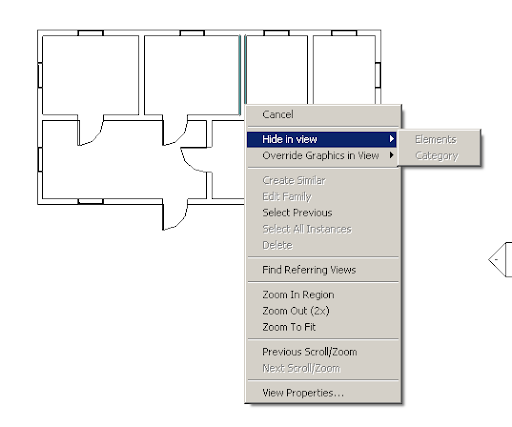
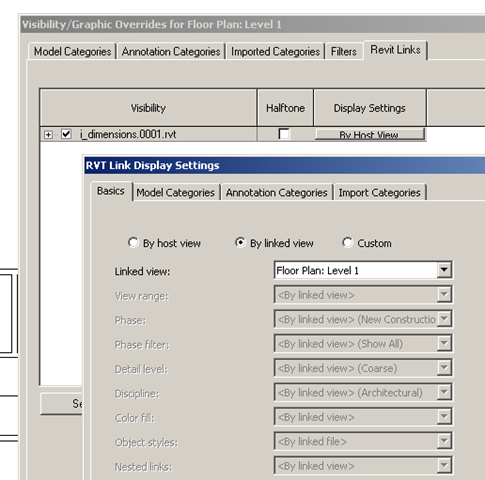
    If you set the display setting of the RVT link "By Linked View" in the VG dialog box, then we don't get options in the "Hide in View" right click menu (see pic below)

    image image

    if you set the display setting of the RVT link to "Custom" in the VG dialog box and select a view for the linked view option, then we don't get options in the "Hide in View" too.

    image image

    However, when you set Linked View option in the basic tab to be None, then you can TAB select and hide individual objects.

    image   image