Monday, June 30, 2008

Removing Invisible Constraints

We had a situation at office: An user tried to move a wall and Revit moved two other walls along with it. We searched for any constraints or locks. None. Even if the constraining dimension is deleted, Revit shows a lock when the constrained elements are selected. We searched for the missing constraints using the technics here. To no avail.

Updated 20080724: There is a "Constrains" object in the Annotation category in the VG dialog box. May be constrains were switched off in that project...in such a case, it is easy to switch it on > select and unconstrain.

The project is quite complicated with phases, worksets, design options, etc. We just wanted to get rid of the constraint. To select and delete the invisible constraint:

  1. Selected the wall and moved it with the Disjoin option.
    image
  2. Revit gave an error saying some objects will be deleted.
    image
  3. The constraining dim was the first one in the list. We could not check the box and delete it and we could not delete the other objects (like wall tags, etc.) along with them. So we noted the object id and canceled out of the command.
  4. We did: Tools menu > Elements ids > Select by id and selected the constraint and deleted it.
    image

Thursday, June 26, 2008

Phone blogging

Surprisingly nothing happened vis a vis revit today. I have been using live writer for some time to blog. I tried using the 'blog by email' option in blogger sometime back, but that would not post images etc
(login into blogger dashbd, > settings > email tab to set your mail to blogger email. I think anyone who knows this email address can post a blog!)
Today I tried it again. It attached a picture. This should allow me to blog from my phone directly. Cannot do screenshots, but should work fine for a personal blog.
The picture is that of my 2.5 YO daughter Yazhini.

Nicholas iyadurai
(using HP iPAQ)

Wednesday, June 25, 2008

Blank Revision Tag

This has been a recurring problem in Revit 2008. (have not yet occurred in RAC2009). After displaying correctly for some time, some revision tags don't show the revision numbers anymore. They just go blank. (when you select the tag, it shows a question mark in red). It usually does this whenever we switch from project to sheet revision tracking.

Re-tagging the cloud does not solve the issue. If we have some of these lost tags and some correct tags in a sheet, then the revision schedule in the sheet reports two separate rows for the same revision. (if grouped by revision numbers)

If we go to the properties of the revision cloud, the parameter points to the correct revision.

image

The only method we have found to bring back the revision numbers in tags is to erase the view from the sheet and add it again. If all the tags in all the views in the sheet are corrected, then the revision schedule corrects itself.

Another workaround is to cut and paste the revision cloud along with the tag in the same place.

Tuesday, June 24, 2008

copy paste detail lines - elements

Revit allows objects to be copied and pasted by using various options. Eventhough copying and pasting is very straightforward, Revit does not allow this operation all the time. If model and detail objects, dimensions are mixed, Revit does not like it. Sometimes, when we copy and paste detail objects, Revit does not do anything. This occurs sometimes with detail objects. If copy / paste does not work you can:

  1. Try the 'Do Not Crop View' option. This allows to paste the objects most of the time.
    image
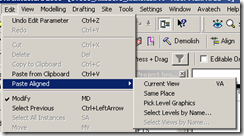
  2. Then try using the "Same Place" option for Paste Aligned. Eventhough the Revit Help file says "Same Place: Pastes the elements into the same place from where you cut or copied them.", this option works in other views too.
    image

Monday, June 23, 2008

Display blackout troubleshooting

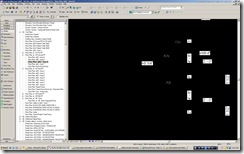
We recently upgraded a 120 MB project to Revit 2009. The upgrade went smoothly. Except for one person. His display blacked out every two hours. The Revit drawing area was fully black and when he hovers over the objects those objects would pre-highlight. Closing the project and opening it again would solve the issue. This is a pain, especially combined with a Serious Error. The display card we used was ati fire gl v 3350. This card was recommended in this thread at augi. (http://forums.augi.com/showthread.php?t=70735) Please read this thread if you have any hardware issues. Wonderful thread.

080619 Revit Error 01

image

Here is our chase. Yours might vary!

  1. Created a new local file. Didn't solve the problem.
  2. Updated the graphics card driver to the latest version.
  3. Second thought was to deactivate Open GL in Revit from Settings menu > Options...Graphics tab. The option was not available. (http://revitize.blogspot.com/2008/06/opengl-not-available.html) Even disabling the second monitor and checking the Windows Hardware acceleration didnt help.
  4. We switched off the windows Hardware acceleration in the Windows Display Properties > Settings tab > Advanced > Troubleshoot tab. But didnt help.
  5. We did get similar blackouts in ADT 2005 sometime back. In that case, we had to deactivate the support for hyperthreading to solve this. We had set the WHIPTHREAD autocad variable to 0. Since Revit didn't have such a command, we tried setting the AFFINITY in the Windows TaskManager and by using SMP Seesaw based on the "Revit and Dual Core" entry at http://revitcoaster.blogspot.com/
  6. Because we are running 32 bit version Windows, we had the 3GB switch on. This option, typically creates some issues (cannot access the internet, display issues, unpredictable Windows, etc.). We tried the USERVA setting along with the 3GB switch. Microsoft help on this issue here. This didnt help. Deactivating the 3GB switch altogether also didnt help.
  7. In the end, we just swapped a nVidia card and things are fine. (We have the "ati fire gl v 3350" in other machines, which work fine too!)

Friday, June 20, 2008

OpenGL not available

We have had issues on a particular computer with Revit 2009 display. When we went to turn off the Open GL option in the Settings menu > option command; graphics tab, it was not available.

image

The graphics card supported OpenGL. If we had set NONE in the Hardware acceleration in the Windows Display properties (accessed from the Control Panel) (settings tab > advanced > troubleshoot tab), this can happen.

image

Autodesk also told us that the OpenGL option wont be available, if we had the 2nd monitor enabled.

Thursday, June 19, 2008

Plan region stops working

In Revit 2009:

If you are working on a big project, once in a while, the plan regions you had created before become toooooo tired and stop working. The irony is that they might have been working fine for the past 2 weeks, then suddenly they would behave as if they have the view range as that of the view itself.

image

Changing the view range in the plan region does not work. Neither changing the view range of the view itself. In the pic below, the window at 6' sill is not visible, even though the plan region is set to have the cut plane at 7'.

image

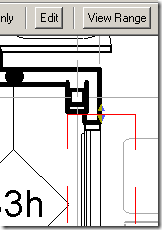
To correct this bug or memory issue, you have to select the plan region, and click edit in the option bar,

image

and then just move the plan region boundary by an inch (and you could move it back too!) and Finish sketch. Voila!

image

The window is back. However, if you have too many plan regions in the view, this process is painful. I hope someone comes up with a better solution.

(The other option is to send the file to Autodesk via FTP and wait for a couple of days....)

Wednesday, June 18, 2008

ProteinMaterialLibrary.cab install - download problems

Autodesk announced the web update 1 for RAC last week. During the installation process, the installer tries to download the ProteinMaterialLibrary.cab, which is 679 MB. Autodesk strongly recommends us to update the library because of the changes made to them. However, it looks like the ProteinMaterialLibrary.cab download is not usually completed successfully. (http://forums.augi.com/showthread.php?t=78745&page=4)

There is a direct link to the ProteinMaterialLibrary.cab but I am NOT sure whether this is the Web Update 1 version. Autodesk is giving away this update only to subscription customers. However this link can be accessed by anyone, and so this may not be the updated CAB!!!

I asked autodesk about this via the subscription support request.... They are asking us to do download the installer again to reinstall RAC (another 400MB)

hmm...

Tuesday, June 17, 2008

Visually differentiating elements with different parameters

The use of filters in Revit allows us to change the display of certain elements based on certain parameters.

Tagging walls:

Typically, we dont tag the most common partition type in our documents. We add a general note like "All partitions are such and such (B3d) Unless noted otherwise". So, while tagging the walls, we wanted to see all the walls that belonged to the most common type visibly different, so that it was easy to tag other walls. There are so many ways to do this. But Filters worked the best for us.

  1. Settings Menu > Filters and created one for the B3D wall type.
    image
  2. Added this to the visibility graphics dialog box > filter tab for a view
    image
  3. Changed the color overrides for that filter in that view.
    image
  4. The resultant display view of the made it easy to identity the B3d walls. After finish tagging the walls, the filter can be easily removed from the VG.
    image 

Monday, June 16, 2008

Selecting elements with a particular parameter value

Revit allows us to select objects in many ways. Here is a situation we had the other day. We want to select all the walls that had the value "B3d" as their Mark value. We could not select the wall type > right click > and select all instances, because walls from different types had this parameter set to 'B3d'. What we did was to

Create a wall schedule

  1. grouped by the particular parameter (Mark value)
  2. NOT itemizing elements,

Now, whenever we select the particular row in the schedule to select all the elements that were grouped in that row get selected in the plan view.

image

Thursday, June 12, 2008

Totaling rows in a Schedule

The steps are described in Revit help: Adding Column Totals to a Schedule

For eg., to get the total square footage of all the rooms, start with a Room schedule.

image

The Sorting/Grouping tab in the View property of the schedule, has an option called Grand Totals. You have to check that.

image 

Then you have to go to the Formatting tab and select the specific parameter you want to be added ('area' in this case) and check the "Calculate Totals' option.

image 

And you get,

image

If you want to group get individual totals of bedroom, dining, etc., then you can go back to the sorting/grouping tab and change the sorting to Names and select the footer option like

image

and you get,

image

Wednesday, June 11, 2008

Custom Hatch pattern in Revit

Revit allows AutoCAD hatches to be used. The AutoCAD hatch pattern files have an extension 'pat'. They are just text files. They can be opened in a text editor like notepad. Like this Brick Flemish bong hatch.

*Brick_Flemish, Brick: Modular - Flemish bond
0, 0,0, 0,2.666666666
90, 0,0, 2.666666666,6, 2.666666666,-2.666666666
90, 4,0, 2.666666666,6, 2.666666666,-2.666666666

You can modify that to:

*Brick_Flemish, Brick: Modular - Flemish bond
;%TYPE=MODEL
0, 0,0, 0,2.666666666
90, 0,0, 2.666666666,6, 2.666666666,-2.666666666
90, 4,0, 2.666666666,6, 2.666666666,-2.666666666

'save as' for Revit. To create a Drafting pattern, you enter ";%TYPE=DRAFTING" instead of ;%TYPE=MODEL.
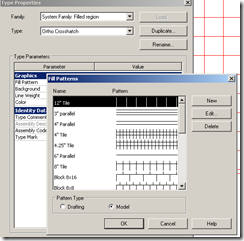
You can import this pat file from the property dialog box of any Filled Pattern

image

or from Settings menu > Fill Patterns...

Monday, June 9, 2008

Moving filled region entities

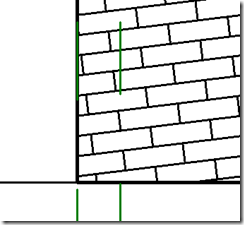
Revit allows us to move the origin or hatch lines that are part of the filled region. For instance, to align the brick pattern in this elevation,

image

you can TAB select one of the vertical lines and then use the move command to move it.

image

You can also rotate them.

image

However, this works only in Model patterns. For filled regions that are part of the Drafting pattern, this option to move/rotate does not exist. However, you can go into the Filled Region property,

image

and change the drafting pattern to a similar model pattern.

image

Even though these model patterns might look similar, they don't become larger or smaller based on the scale of the view. (A 12" x 12" tile pattern always measures 12".) This might be a good thing or a bad thing based on what you want to achieve.

Friday, June 6, 2008

Phases and Revit Links

Revit 2009 has a very good option to set phase mapping for a linked Revit file. This option is available in the Type Properties dialog box of the linked Revit File.

For eg., if we are working on an Addition to an building that was constructed 2 years ago (both revit projects), then we can map the "New Construction" phase of the building that was constructed 2 years ago to the "Existing" phase in the Addition!

image

Wednesday, June 4, 2008

Groups and Phases

Groups, by themselves, don't have any phase parameter. So, you cannot create a group and then change it's phase.

image

However, individual members of the group (accessed via 'Edit Group' function) have phase parameters. (more detail about this below!)

When you create a group, the group can have elements that belong to one phase or multiple phases. Irrespective of the phase of the view the Group was created, the sub elements of the group live in their respective phases within the group. The pictures below show an Existing Phase view (on the left) and a New Construction view (on the right) with the same instances of the groups.

image  image

However, when you copy any group, the new instance of the group takes the phase of the current  VIEW (similar to the ROOM object).  This also means, that if a group has elements from many phases, all these elements become part of the phase of the current view. The pic below shows originals and copies of different groups, all becoming part of New Construction, which is the phase of the current view.

image

In RVT 2008: Changing the phase of the elements that comprise a group - using the Edit Group function - results in unpredictable results based on the phase of the current view. Moving objects from one phase to another does not get propagated correctly to other instances of the group. Depending on the current view, the phase parameter gets swapped / unchanged, etc.

In RVT 2009: Changing the phase of the elements that comprise a group - using the Edit Group function - changes only the phase of those particular elements in that particular instance of the group. The change does NOT get propagated to other instances.

  • The effective way to propagate changes in the phase of the elements is to create a new group with elements in different phases and then swap this new group with the old ones.
  • To assign a specific phase for a group, create it in the view which has this specific phase assigned to it.
    image
    You can create a group by copying, copy/pasting, mirroring, dragging from the project browser > Groups, etc.

Tuesday, June 3, 2008

Editing Level Heads text height

The text height of the level heads are a bit larger (1/8") than the default text height (3/32"). One of our teams wanted to change the height  of level heads to be that of normal text height. Here are the simple steps:

  • Get the name of the level head family that is being used in the project level heads.
    image
  • Find this type in the project browser > families > annotation symbols >
    image 
  • Right click and select Edit.
  • Once in the Family Editor, change the height parameter in the Label type properties to 3/32"
    image
  • Load into project.
  • Now, if you want to have different size level heads in Sections, elevations and details, then you are on your own!

Monday, June 2, 2008

Revit Link differences - host, link, custom

In continuation to "Hiding individual objects in linked Revit files", people asked me why would one choose one option of linking over other - By Host View or By Linked View or Custom?

******************************************************
I didn't expect this post to become too long. So, here is a summary:

  1. If you want to see annotation objects from the linked file, you have to select "By Linked View"
    OR
    select "Custom" and then select a view for the Linked View option.
  2. If you want to individually (or collectively) switch on/off objects in the linked model, then don't select By Linked View.

image

******************************************************

Here is the full version:

If you choose By Host View:

  • You can individually switch on / off objects.
  • You cannot collectively switch on / off a category in the right click menu. (If you try, all the objects that belong to that particular category are switched off in both the host model and the linked model in the current view. )
  • You cannot see annotation objects (like Room tags, etc.).

If you choose By Linked View:

  • You can choose to display by any linked view, as long as the linked view is similar to the current view
  • You cannot override any visibility settings for the linked model
  • You cannot individually switch on / off objects.
  • You cannot collectively switch on / off a category in the linked file.
  • You can see annotation objects, as long as the linked view is parallel to the current view and the annotation objects are visible in the linked view in the linked model.

If you choose Custom and 'None' in the 'Linked View' options in the custom basic settings:
image

  • You can override many visibility settings for the model objects in the the linked model
    image
  • You can individually switch on / off objects using the right click menu with TAB Select.
  • You cannot collectively switch on / off a category using the right click menu. However, you can switch off a model category after selecting "Custom" in the Model / Annotation categories tab in the RVT Link Display Settings.
    image
  • You cannot see annotation objects like tag, text, dims.

If you choose Custom and select a view in the 'Linked View' options in the custom basic settings. :
image

  • You can override many visibility settings for the model objects in the the linked model
  • You cannot individually switch on / off objects using the right click menu with TAB Select.
  • You cannot collectively switch on / off a category using the right click menu.
    image
    However, after selecting "Custom" in the Model / Annotation categories tab in the RVT Link Display Settings, you can switch off/on a category there.
    image
  • You can see the annotation objects, as long as a parallel view with annotation objects is selected in the 'Linked View' in the custom basic settings. (If the annotation objects DONT show up, you have to change the RVT Link Display Settings to 'By Host View' then press "Apply" and then change it to "Custom". )
    image

And what about the subtype RVT link shown in the VG? Revit keeps track of each instance of the linked revit file and automatically names them as 1,2,3...) This allows you can control the visibility of individual instances of the linked file or all the instances.

image